
Managing Spreadsheet Templates, Instances, Versions and Revisions
Keeping track of spreadsheets can get complicated. A spreadsheet is like a document in that all of the content - data, format and functionality - is kept in one file, so it's easy to just email it around the team for review and revision. Unlike a document, you can't easily see all the changes between the two versions, and it can be very difficult to merge two versions of a spreadsheet that have diverged.
Before we can really get into talking about this, we're going to have to come up with some standard terms. Today I'm going to put forward several terms we can use to talk about spreadsheet files: Templates, Instances, Versions and Revisions. These are going to help us talk about how to control spreadsheets through their lifecycle.
This one might be one you want to bookmark, because these terms are going to come up again!
1.
An Excel
Template
is a spreadsheet that is saved with a special flag and file extension, for example "
xlt
", "
xltx
" or "
xltm
". Templates are just like normal spreadsheets, except that when you open them (e.g. by clicking on them in file explorer or through a link) they open up as a
new spreadsheet document
containing the contents of the template. This forces you to save it as a different file without changing the template itself.
2.
An
Instance
of a spreadsheet is a copy where you intend to keep the functionality intact, but change the data it's operating on. If it’s a data processing spreadsheet then this would be the one that you enter/transcribe/copy data into. You’d create a separate instance for each set of data you need to enter. Templates are very useful for doing this.
3.
A
Revision
is a snapshot of a particular file at a point in time, denoting small, minor or incremental changes. For example revisions might be tracked at each save within a document management system, or manually taken when bugs are fixed in a released version.
4.
A
Version
of a spreadsheet is also a snapshot of a particular file at a point in time. A version usually denotes a milestone, for example on release or after a certain event. Often this manifests as a copy of an instance, for example “
SpreadsheetX - MOB review 23Oct2023.xlsx
”, but it might also be a release version of a template, such as "
SpreadsheetY - v02.01.xltx
”. Note that in these examples the version information is being tracked in the filename - but that’s certainly not the only option.
The rest of this week we’re going to explore these concepts, and figure out some do’s and don’ts around controlling the mess of spreadsheets hanging around our file systems.
Until next time, thanks for reading!
– Brendan
Drifting and Branching when Processing Batches of Data in Excel.
Drifting and Branching when Processing Batches of Data in Excel.
This week we're looking at tracking and controlling the proliferation of spreadsheet instances when, for example, processing batches of data.
Let's say that you have three batches of data that need to be processed in the same way: Mass data over time for trial subjects from three different studies. The spreadsheet normalizes the weights to a % change from day 1, calculates some basic statistics, and charts the results.
Once you have the basic functionality programmed into the spreadsheet, how are you going to apply it to each of the three datasets?
One common way to do this is to create new instances of the spreadsheet by saving an existing one as a new file with a new name. Then you delete the cells containing data in the new file to start filling it in again with the new data set. This workflow can look like this:
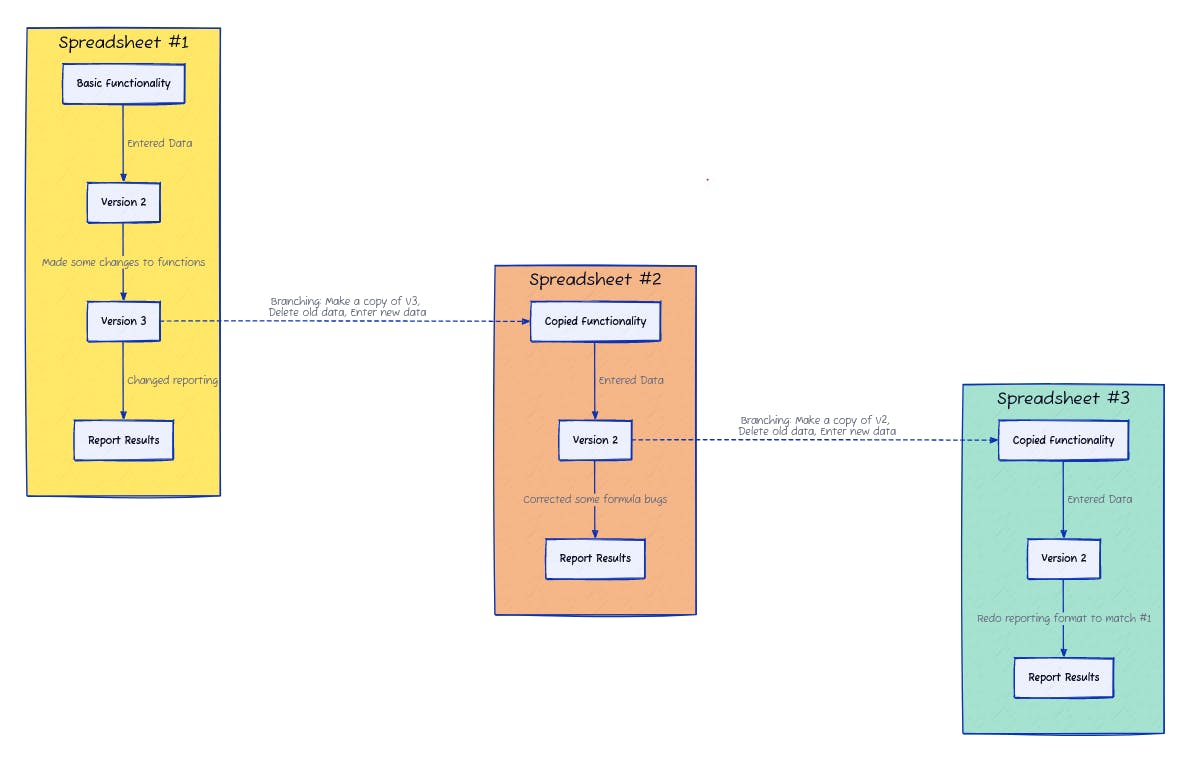
We're creating three different instances of the spreadsheet. Data from Study #1 is entered into the first spreadsheet. When the dataset from Study #2 is ready to be processed, a copy is made of the latest version of Study #1's instance.
This process is repeated for the dataset from Study #3. Except this third time there's a choice of spreadsheet instances to copy from! Do you make a copy of the first spreadsheet, which by now has been reported and finalized? Or the second, which is still being worked on but seems like it's the most recent?
In our example this has created a bit of a mess. Spreadsheet #2 didn't get the updated reporting page used for Study #1. Even worse, spreadsheets #1 and #3 didn’t get the bug fixes that were applied to spreadsheet #2! None of the changes to the other instances were applied back to Spreadsheet #1.
If we didn't have this diagram in front of us, how would we tell which spreadsheet got which updates to functionality? Review functions and formats cell-by-cell? How do we know if there were any unintended changes that went along with the updates?
There are two problems at play here.
Firstly, the functionality of the spreadsheet - its calculations, operations, and formatting - is
drifting
across the new instances. Since there's nothing stopping you from changing the functionality of the spreadsheet while inputting the data, it's very hard to be certain what differences there are between the instances, and whether those changes were intentional or not.
Secondly, since there is no base or 'official' source to pull from each time we make a decision to pull from one particular version in time to create a new instance, we risk diverging functionality. If either the source or the target instance is changed after that point, then we've created one or more new
branches
of the spreadsheet's code.
Here we're only talking about three datasets. If you have many data sets to analyse over time - let's say weekly sample analysis - how do you keep track of drift and branching? Are any of the changes unintentional, and if so, how widespread are they?
Tomorrow we're going to take the first step at taming this mess, and look at applying controlled templates to separate the functional aspects of the spreadsheet from the data and results.
Until next time, thanks for reading!
– Brendan
Leveraging Excel templates to control drift and branching in data processing spreadsheets.
Leveraging Excel templates to control drift and branching in data processing spreadsheets.
Today we’re going to take the first step at controlling
drift
and
branching
of our data processing spreadsheet instances. We’ll start with a clearer definition of the two problems we observed in yesterday’s post:
Drift
: Uncontrolled changes to spreadsheet functionality after it’s been released for general use.
Branching
: When two instances of a spreadsheet that are supposed to perform the same function diverge in functionality.
A fundamental tool to solving our two problems is the Excel template. Remember that essentially a template is a flag that tells Excel to open this spreadsheet as a new document every time, containing the contents of the template. Note that templates don’t in themselves solve either drift or branching. What they do provide is an opportunity to set a single, identical starting point for all future instances, provided the template itself doesn't change.
First, we must require that all new instances must start from the template. Then somehow we need to restrict users from making changes to the functionality of these new instances. The result is a spreadsheet where every instance has the same starting functionality, and that functionality cannot drift while the instance is being used to process data.
So now our three-study data processing example from yesterday looks more like this:

We have a single point of control for tracking and changing the functionality across instances. If the template changes over time, we need to make sure everyone switches to the new template, and keep a note of which template version each instance was generated from.
Of course we haven’t completely solved one of the branching problems we observed yesterday: If you do make changes to the template itself, only
future instances
based on the updated template will include those changes.
Unfortunately Excel doesn’t have much to offer in terms of updating an underlying template of a spreadsheet instance, nor for automatically merging the functionality of two versions of a spreadsheet.
However, the controlled data entry templates we've envisioned here do help a little: with some good practices and careful quality control, re-entering data into a new instance based on an updated template can be relatively easy and low risk.
Until next time, thanks for reading!
– Brendan
Testing data processing spreadsheets
Testing data processing spreadsheets
This week we’re looking at tracking and controlling the proliferation of spreadsheet instances when, for example, processing batches of data. So far we’ve seen that we can gain some control over the drift and branching of functionality in spreadsheet instances by using Excel templates.
There’s one big side benefit to having all your data processing originate from a locked down template. If you’ve protected the template’s functionality correctly, you’re guaranteed that the functionality isn’t going to change across all those instances and versions that are proliferating across your system in the normal course of processing data. More on taming that later.
The locked down template is now a
single place
where you need to focus any testing of the functionality. Furthermore, because each instance you create from that template have identical functionality, you can test your template against multiple data sets with known outputs.
Going back to our example spreadsheet: Weight data over time for trial subjects from three different studies. The spreadsheet normalizes the weights to a % change from day 1, calculates some basic statistics, and charts the results. You could test the template against several full datasets, including some that push the boundaries of the functionality. For example:
•
A set of 'easy' numbers that can be visually verified are correct.
•
A set that looks like real weight data, with the results verified against another calculation method.
•
Are expected ranges handled and reported correctly? What happens if you miss or add decimal points during data entry, so that the data is much larger or smaller than expected?
•
Are errors handled and reported correctly? What happens if you put in the wrong
type
of data like a date instead of a number? How about valid blank data (such as when a patient misses a weigh-in)?
•
What happens if you cut and paste data from one data entry area to another?
The results from each of these tests can be saved, and now you have documented testing of your spreadsheet's functionality.
Locking down, versioning and controlling the distribution of those templates, then, is one of the most important concepts when developing, testing, and validating Excel spreadsheets for processing data in a regulated environment.
Until next time, thanks for reading!
– Brendan
Locking down that Excel template
Locking down that Excel template
This week we've talked about locking down, versioning and controlling the distribution of an Excel template as the cornerstone of developing, testing, and validating spreadsheets for processing data in a regulated environment or in any critical application.
So what does it mean to "lock down" an Excel template? Password protect it? Mark it read-only? Hide it in a maze of similarly named directories? Today we're going to look at how to lock down functionality while enabling configuration and data entry.
Before we start let's restate our goal here. We want to create a template where we restrict changes to the functionality, formatting, labels, etc. while allowing the user to enter data and set any parameters necessary for the data analysis.
1. Set cell-level locking
1. Set cell-level locking
Before you can apply restrictions to what can be done to the cells in a worksheet, you've got to select which cells will be 'locked' and which will be 'unlocked' when the protections are applied.
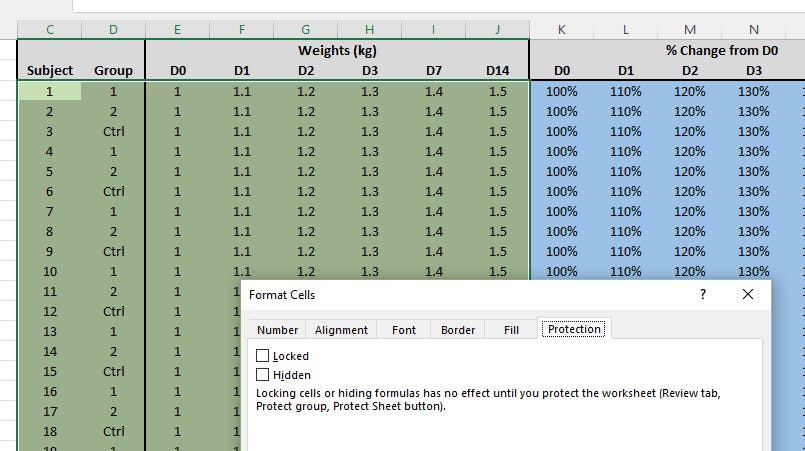
In current versions of Excel, worksheet protection defaults to "locking" every cell on a worksheet - which is not what we want, since no-one would be able to enter any data. So we go through the workbook and choose all the data entry and configuration cells, and unlock them. Believe it or not this setting is kept with the cell’s formatting... I know, I know.
Make sure everything else is locked, including formulas, labels, and blank cells that aren’t meant to contain anything.
Now, setting whether a cell gets locked or unlocked doesn't actually
do
anything... you need to protect the worksheet first before anything is actually locked.
2. Protect each worksheet
2. Protect each worksheet
Once the data entry and configuration areas have been unlocked, then you can protect each worksheet. This will present you with a checklist of options. Don’t just choose Excel’s defaults - go through the checklist and decide on exactly what you need the users to be able to do. There are consequences to each choice that is made here, so test out your use case and make sure the protected sheet behaves as expected!
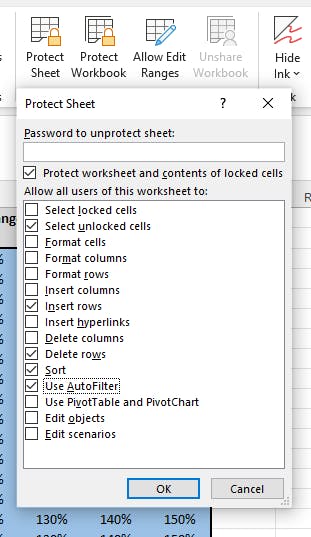
You'll need to repeat this process for every worksheet in your template. If you're going to lock and unlock a bunch of worksheets in a big template it can get a little tedious - when I'm developing I often set up a little macro to go through and lock or unlock all the worksheets in one go.
3. Protect the workbook structure.
3. Protect the workbook structure.
Finally, you should protect the workbook structure. This restricts the user from adding, deleting, un/hiding, or renaming worksheets. It also stops them from moving worksheets around, but we’re not so concerned about that.
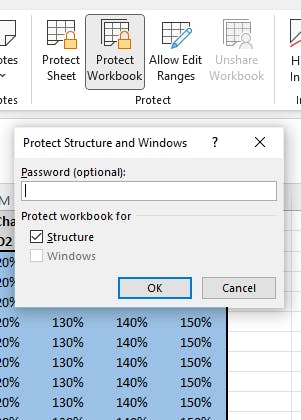
Now we've got a template where most of the functionality of the worksheet is protected from accidental change.
4. Passwords and other protection options
4. Passwords and other protection options
Whether you want to use a password to protect the
worksheet or structure
depends on your use case and who its going out to - it’s probably a good idea just to dissuade anyone from ‘just making a quick fix here’. If you do add a password, do keep a record of it somewhere, and it might be a good idea to add an unprotected version to your backups just in case.
There’s also an option to encrypt and password protect the whole spreadsheet - but it you're looking for security you’re probably better off using the external infrastructure (e.g. shared drive, EDMS, etc.) to apply access restrictions and role-based permissions to the file itself.
Finally, there's an alternative method of locking down cells in Excel: the “Allow Edit Ranges” feature. This let's you define Windows group rights for who gets to edit which ranges, but only works on Windows computers that exist on an enterprise domain. And while it lets you name ranges, it doesn't offer up previously named ranges to protect... which doesn't make much sense to me.
You could use this feature to enable specific users to edit the template (or without the domain feature just set up passwords for specific ranges), but I think it’s of limited use for data entry instances. Unless of course you already have domain-level groups specified for e.g. operators, QC and QA roles... anyway it's there if you want to get creative!
And that's about it for today. If you need help figuring any of this out, well, there are so many Excel tutorials online you should be able to find some in-depth exploration of each of the options and how they interact. Or if you want to see a video of me walking through these activities using a relevant example in Excel, let me know!
Until next time, thanks for reading!
– Brendan
Subscribe to the HaiQu newsletter!
Join me on the HaiQu newsletter as we take a few minutes to explore, design, test and improve the critical systems we use in our regulated facilities. From spreadsheets and software to SOPs and forms and beyond.
We'll never share your email. Unsubscribe any time.