
Encapsulating Spreadsheet Functionality into Discrete, Testable Modules
The principal of separation of concerns
The principal of separation of concerns
When you separate the spreadsheet’s functionality from the data - for example, by having a locked-down template in which you can only input data and perhaps some configuration - you are “separating concerns”, making it more modular.
Separation of concerns
is a design principle in computer science whereby a computer program is separated into distinct parts that each address a different aspect of the program. The basic goal is to modularize a program into pieces that a) only deal with a subset of the functionality or information and b) ‘hide’ the complexity of what it’s doing behind a well-defined interface.
This week we're going to explore this concept in relation to building spreadsheets for critical data analysis tasks.
First of all I apologize, I’m going to sound like a typical engineer and use a car analogy. What can I say - it's Monday and I’m not feeling particularly creative.
Take, for example a car. There’s a compartment for holding people, one for holding the engine, one for luggage, and one for petrol. Obviously some separation is necessary - you certainly don’t want to store petrol in the passenger compartment, or put luggage in with the engine.
Internally, the design of the petrol tank can be quite sophisticated. It requires knowledge of safety standards, material compatibility and strength, flash points etc., not to mention the intricate interplay between various sensors and controllers and the data they send out.
But to the rest of the car the petrol tank is pretty simple! There’s a
well defined interface
for interacting with it, for example:
•
The tank needs to be the right shape and size;
•
It needs to have some kind of a hole with a cap on it to put the petrol in;
•
A line of a certain size for delivering petrol to the engine;
•
Some wires to connect to the car’s computer; and
•
Known formats for the data that's sent back and forth to the car's computer.
In fact, you could replace the petrol tank with another without changing the rest of the car. As long as it meets the rules of the interface, you could even exchange it with another model that uses different materials or sensors.
When developing spreadsheets and similar software, modularity has a range of benefits that we can take advantage of:
•
You can improve or modify one part of the system without having to know all the details of the other parts.
•
Components can easily be re-used.
•
It’s easier to find and fix bugs because you have a reduced area to look for them.
•
It’s easier to test because you have well defined behaviour and interface.
There are some other advantages to well-separated modules that come into play over the long term, for example being able to expose different versions of a module interface, allowing you to work on and test new features while leaving the old version intact.
Until next time, thanks for reading!
– Brendan
How do you separate concerns in a spreadsheet?
How do you separate concerns in a spreadsheet?
This week we’re exploring the principle of “Separation of Concerns” for designing and building spreadsheets.
We’re looking for ways we can split a spreadsheet’s data and functionality into parts that are each responsible for one thing - whether it’s to perform a calculation, hold reference data, or take input or whatever.
But this isn’t computer code in the traditional sense, so how can you do this kind of separation in a spreadsheet?
We have several opportunities, using familiar parts of the spreadsheet such as worksheets, named ranges and tables. We could use borders, colours and cell locking to block out areas of functionality. We can use forms and buttons, or vba code. We can even treat separate files as 'modules'.
Today we’ll look at a few of these options.
Separate data from functionality.
Separate data from functionality.
One of the big enemies of data integrity in a spreadsheet is the intermixing of the data and functionality layers.
The canonical example of separating data from functionality is to use a combination of templates and cell locking. We create a controlled template that forces new instances with protected functionality.
A more extreme version of this is to use separate spreadsheet files to create a network of linked ‘databases’ around a core 'application', for example where there is one reporting spreadsheet that links to multiple workbooks each containing different data sets.
Other opportunities for separating out functionality include hiding core functionality within a hidden worksheet, or even moving it out entirely into VBA modules.
Separate data entry, configuration, calculations and reporting.
Separate data entry, configuration, calculations and reporting.
Another way to modularize is to draw lines between the basic data processing components: data entry; configuration; intermediate calculations and reporting.
The easiest way to create this kind of separation is to dedicate worksheet tabs to each responsibility, making sure we name them well. We can also use named ranges and tables to achieve a similar effect. I recommend putting reference data and constants into their own named ranges or tables, and if a lookup table is big enough, give it its own worksheet tab.
In fact, I find that a combination of a worksheet and named ranges/tables works really well in many situations: define one table per worksheet, named similarly (but still uniquely). That way you get the benefit of the named reference in formulas, but also can easily see where the named table or range sits in the spreadsheet.
Often you want to mix and match methods. For example, data entry could be on its own worksheet while configuration could be through a form that shows up when you click a button. You could also limit which cells can be selected at all, essentially creating a form out of a worksheet where the user can only tab between data entry cells.
On small worksheets on the other hand you could just block things out with colours, borders, hidden rows/columns or worksheets.
Split processing into several steps.
Split processing into several steps.
Any complex data processing pipelines should be split out into several components.
A common method of doing this is to split calculation steps into intermediate columns or worksheets. You can also use the
let
and
lambda
functions and VBA User Defined Functions (UDFs) in VBA to encapsulate smaller pieces of code.
Of course once you get into VBA you’re into traditional coding and there are many language features that help you modularize and encapsulate code. Modules, classes, functions and procedures, and namespaces, to name a few.
Ok, so Excel gives us many ways to split things up, allowing us to do some separation of concerns with a bit of care.
If you’ve been paying attention then you might have noticed that I’ve only addressed one part of my definition for ‘Separation of Concerns’, though. Where does the "well-defined interface" come in? Can we do that in a spreadsheet too? And what are the benefits and drawbacks of these methods?
For that you’ll have to stay tuned.
Until next time, thanks for reading!
– Brendan
Encapsulating functionality behind a well-defined interface
Encapsulating functionality behind a well-defined interface
Most traditional programming languages provide several ways to abstract away complexities of code, and instead present a well defined interface.
What does that mean? Well, in simple terms it’s a restricted set of entry points into that code that make it clear how you can interact with it.
Take, for example, a web page with a form that takes your username and password. The interface is made up of the username field, the password field, a ‘forgot my password’ link and perhaps a few other links. Other than that, you don’t really have any other access to what’s going on behind the scenes.
You can do the same over a piece of code - for example in many languages you would define a
module
or
class
that processes someone’s login information. You might expose a function for setting the username and password, something like:
login.request(username, password)
and perhaps a way to ask whether login was successful, and perhaps a ‘key’ to access the user’s information in other parts of the code once they have been confirmed.
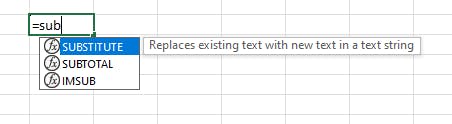
Apart from these exposed functions, the rest of the encapsulated code is usually hidden away from the other parts of the program. Typically the developer’s tools will help out by listing the functions that are exposed as you write the program. Something like this:
You can also define your own restricted interfaces around parts of spreadsheets as well - though it takes a little bit of knowledge of how a few features work together.
Later on we’re going to go through three examples based on the scenarios we talked about earlier:
1.
Blocking out and even restricting navigation to data input areas.
2.
Encapsulating a lookup table for reference data.
3.
Encapsulating calculations, and using named ranges as the interface.
Until next time, thanks for reading!
– Brendan
Encapsulating components in Excel. Example 1: worksheet as a form
Encapsulating components in Excel. Example 1: worksheet as a form
As promised, I’m going to provide some examples of “Separation of Concerns” in Excel: creating modularized components with well defined interfaces.
The first example we’re going to look at is to basically create a ‘form’ out of a worksheet, where the only interactions the user can make with the worksheet are the ones we’ve allowed. We'll also expose a convenient interface for developing the rest of the spreadsheet too.
Before we start please remember that these are
contrived examples
built to showcase how several features can interact. This is not necessarily how you should build your spreadsheet - what will work best will depend on your requirements and regulatory outlook.
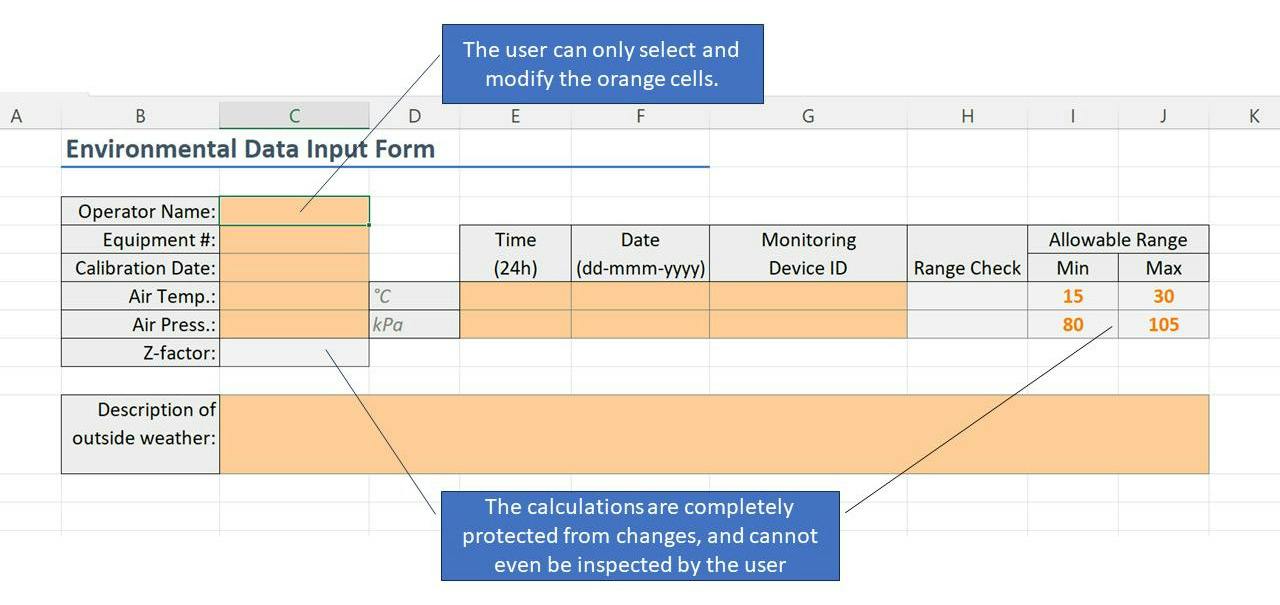
In this scenario we’ve build a worksheet that takes in some environmental details for a laboratory, and then calculates the ‘Compressability Factor’
Z
for use elsewhere:
1.
Colour code the input cells, output cells, intermediate calculations and labels.
This provides the user with visual cues as to what the interface is. Here I’ve chosen Excel’s default colour palette, but if you search around you can find some pretty detailed formatting standards that work well for various scenarios. Of course, you can make your own up too!
2.
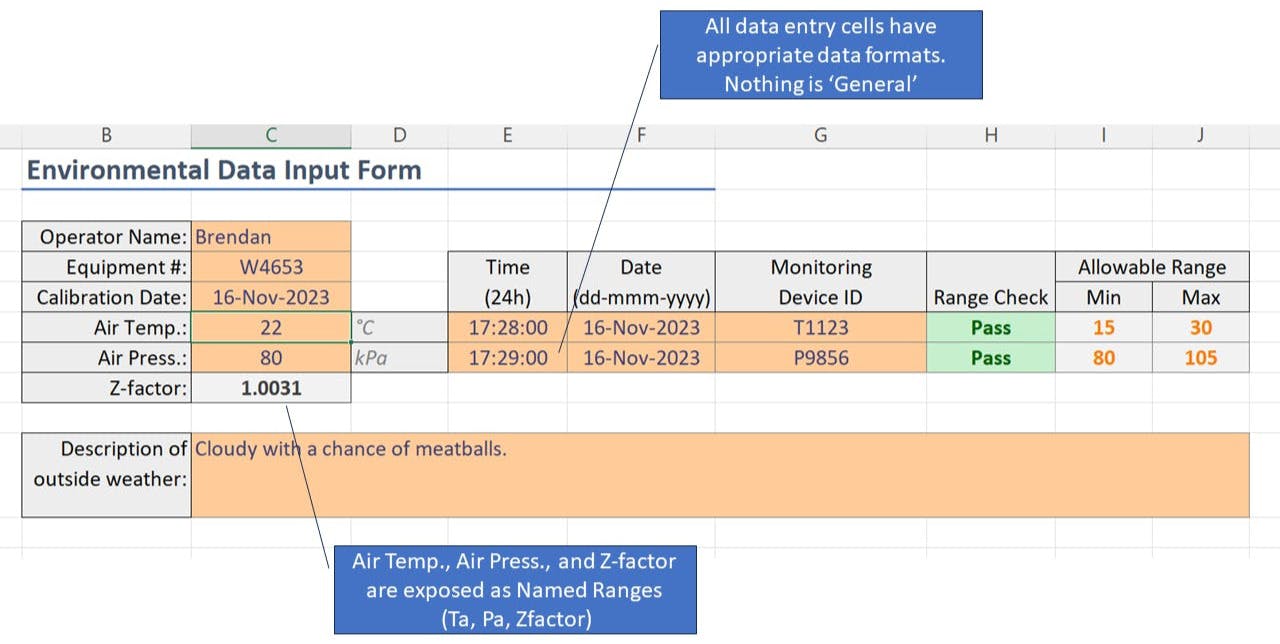
Format each of the input cells as required.
Avoid “general” formats so that the data entry user doesn’t have to think about it.
3.
Unlock all input cells.
Select all of the input cells (in this case, all of the orange cells), and unlock them (and only them). TIP: You can use
Find
(Ctrl-f) to “Find all” cells with a certain format, and then select them in one go.
4.
Expose Named Ranges.
Name any input and output cells that you want to ‘expose’ to other parts of the workbook. In this case, I’ve named the air temperature
Ta
, the pressure
Pa
and the calculated compression factor
ZFactor
, so those names can now be used in formulas.
5.
Protect the worksheet.
Make sure the
Select locked cells
option is
unchecked,
while the
Select unlocked cells
option is
checked
.
Now we’ve managed to encapsulate the functionality of this worksheet. The user’s navigation has been restricted to
only the orange cells
. This makes it difficult to accidentally change the functionality of the worksheet. Navigating the data entry requirements is now very intuitive - tabbing through the available cells for the next available entry.
We also have a simple interface that consists of a) formatted data entry cells and b) three exposed names that can be used in formulas elsewhere.
It’s worth noting that all the cells, including the protected ones, are actually still accessible from other sheets by formula reference as usual - we’ve just made it clearer what developers
should
use.
So what have we gained? Some of the advantages include:
•
Separation of data input vs. functionality;
•
Protection of the worksheet machinery;
•
Improved data integrity with clear guidelines on input;
•
A very small test surface: the exposed interface; and
•
Modularity. We could change how the z-factor is calculated, and even do a whole bunch of other things behind the scenes, but as long as we don’t change the interface we don’t need to change any other part of the spreadsheet.
Of course there are disadvantages to this approach too:
•
It’s rigid. Any flexibility in data entry must be premeditated and built-in, because the user won’t be able to make any changes themselves.
•
If something does go wrong, the user cannot see what’s going on ‘under the hood’ to be able to troubleshoot.
•
Similarly, you cannot properly audit any functions without unlocking the worksheet, but unlocking the worksheet opens it up to be changed by accident.
•
Since you can't select locked cells, you can't copy and paste the results without referencing them from another sheet first. Unfortunately with worksheet protection cells are either locked or unlocked, so whatever rules you apply do so to
all
locked cells.
Until next time, thanks for reading!
– Brendan
Example: Using self-documenting Excel formulas for fun and for profit.
Example: Using self-documenting Excel formulas for fun and for profit.
Here's a function definition from a spreadsheet:

What does it do? Is it correct?
Compare that to this one:

Now can you figure out what it's doing? I mean, it's not ideal - there's still some brackets and symbol noise, but ignoring that it's pretty self-documenting, isn't it? And since it uses various named references, doesn't matter where this formula is in the worksheet - the formula doesn't change.
The simple act of naming things drastically improves how easy it is to read and verify formulas. Imagine if your whole spreadsheet was built using the second version. You could almost test it by inspection!
How much uncertainty would you remove? How much easier would it be to find and fix a bug?
Speaking of bugs - assuming we're applying this function to a table of purchases B3:G10, there's a serious bug in the first version - it would subtly undercharge every item from the second one down. Can you see what it is?
Until next time, thanks for reading!
– Brendan
That which we call Sheet1!$A$2:$AC$43: by any other name would smell as sweet?
That which we call Sheet1!$A$2:$AC$43: by any other name would smell as sweet?
Naming things in code is critically important because it’s your primary method of communicating intent to the readers of the code.
You see, the majority of cases a spreadsheet's functionality is written once, but read many times. Whether you’re working with a validation team, end users, and QA; or communicating with your future self when you’re trying to fix a bug; someone somewhere is going to need to understand what that function is doing.
Most programming languages give you multiple opportunities to name things in ways that make the code feel natural - from functions and procedures to classes and modules. And spreadsheets are no different.
In software development we call the art of descriptively naming things ‘self-documenting code’, ostensibly because it doesn’t require any other comment or documentation. In practice you’re going to need a bit of both, or else end up with comically long names for things. An I mean Welsh town long.
So let’s look at a bunch of opportunities to name things in a spreadsheet:
1.
The template filename
: For example a unique ID, descriptive name
based on its function
and the release version.
2.
Instance filenames:
For example A unique ID and a descriptive name based on the
data
within.
3.
Each worksheet:
As a rule, never leave tabs in the workbook as the defaults like “Sheet1” and “Chart1” for anything more than just throwaway calculations. As a bonus, naming your worksheets for a specific data set or transformation will help remind you to
separate your concerns
. More on that later.
4.
Tables, Named Ranges and Cells:
Probably the most useful and underused features in Excel are the ability to name tables and ranges - It’s well worth learning about the difference between these Tables and Named Ranges. On the surface they seem like they should be the same, however, there are benefits and limitations to each that you’re only really going to learn from experience (or, perhaps, by reading enough of my emails…)
5.
Named variables in Let functions:
This is worth a post of its own, but suffice it to say I
love
this new feature that was introduced somewhere around the Covid lockdown. The basic concept is that you get to name one or more calculations as part of an Excel function, and then rather than repeating the calculation, you just use the name later in the function. Not only is this easier to read, it also is more performant. A win-win all around!
6.
User Defined Functions (UDFs) and Lambdas:
With modern Excel it’s even easier to create your own custom functions. It’s even more important to provide them with a good descriptive name. Although I love the
intent
that the Excel team had when they introduced Lambda functions, I don’t love how unergonomic it is to properly test them. However, in small doses they are a valuable tool in a growing toolbox of ways to abstract functionality.
Of course there are many other opportunities to name things in Excel, like charts, figures and pivots; forms, buttons, and other controls. Not to mention the wide array of possibilities when you open up the world of VBA and macros.
The point here is to take the time to learn how to give things a proper, descriptive name; one that abstracts away functionality. Don’t rely on the defaults like “button1” that Excel pre-fills for you - that is unless it truly is a throw-away spreadsheet. Because chances are, it’ll come back to bite you.
You’ll thank me in the morning.
Until next time, thanks for reading!
– Brendan
Assigning names within a formula with the let function.
Assigning names within a formula with the let function.
It’s Friday night, and I’m going to indulge myself with some gushing over Excel’s relatively new
let
function. I promise it
is
related to data integrity. Somewhat.
I love this feature. I’ve been wishing for it my whole adult life.
I believe the
let
function was introduced in 2021, which is about 30 years too late. Being able to assign to constants and variables is a fundamental part of just about every programming language since the 60s, so to anyone with some experience in programming it’s always felt really limiting that you couldn’t do assignment within a spreadsheet formula.
Historically the workaround in a spreadsheet was to just put intermediate calculation steps in separate cells or columns. Of course people didn’t always want those intermediate steps to be visible in their tables, so they’d either hide those columns or, more commonly, just write super long formulas with calculations repeated multiple times.
Neither of these are particularly elegant solutions.
In walks
let
. Their choice of the LISP-like
let
form makes so much sense since the most of the formula language is basically made up of s-expressions. Yes, I know I lost most of you on that one, but it totally excites the nerd in me. If only they hadn’t completely ruined lambdas.
The basic concept of a let function is that you get to name one or more calculations in pairs before writing the formula proper in terms of those names. It goes something like this:
let (name1, calc1, name2, calc2, name3, calc3, ..., formula)
This comes in handy all over the place - for example any time you need to test the result of a calculation before using it. So instead of repeating this same (nonsense) lookup a bunch of times:
= if(xlookup(a1,sheet2!$A2:A50,sheet3!B2:B50) < 0.15,
     b1 + xlookup(a1,sheet2!$A2:A50,sheet3!B2:B50),
     b1 - xlookup(a1,sheet2!$A2:A50,sheet3!B2:B50)
    )
you can now do the lookup once, give it a name like
kprime
, and then use that name everywhere else in the function. Like this:
= let(kprime, xlookup(a1,sheet2!$A2:A50,sheet3!B2:B50),
      if (kprime < 0.15,
          b1 + kprime,
          b1 - kprime
         )
     )
Besides the clarity gained from naming chunks of your calculations, the big win from assignment is that you don’t have to repeat a calculation over and over again - just do the calculation once and assign the result a name.
And you can do this with up to a hundred-something names in one formula. Not sure if I can recommend doing that, but it’s probably important for those people porting Doom to Excel.
Until next time, thanks for reading!
– Brendan
Breaking down the design of our interface.
Breaking down the design of our interface.
Last week we had an example of a worksheet's functionality encapsulated behind a 'form'. The data inputs and results were exposed in via the well-defined interface. Let's take another look at the interface for example 1 in terms of the 'shape' and 'type' of the data coming in and out of our system:
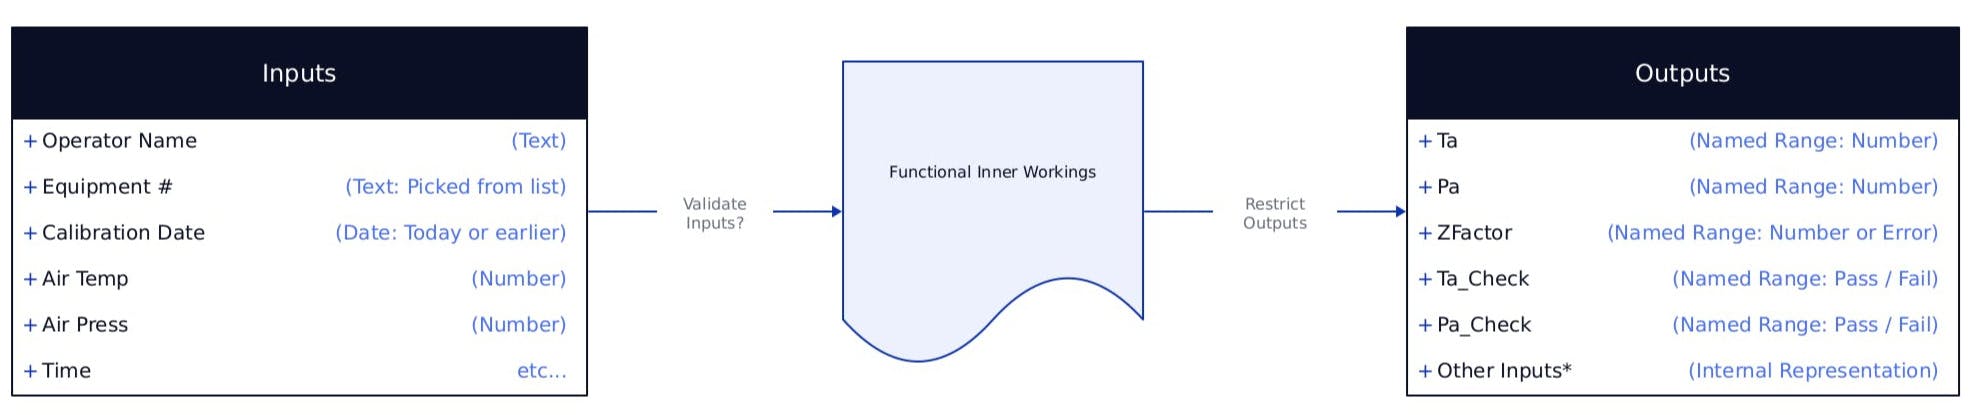
We have a simple system with Inputs coming in from the unlocked cells, some functional workings (the encapsulated code), and some Outputs that we've intentionally exposed. The outputs include the Temperature, Pressure, the results of their bounds checking, and the calculated Z compression factor.
Notice at the bottom of the Outputs table, there's an "Other Inputs*" field - there are a few other things that will be exposed that we have no control over. For example, we can't stop anyone from being able to reference the cells containing all the other input data from other worksheets or VBA modules. Same goes for directly referencing labels, units, etc. We'll have to assume that anyone using our component will be using the 'safe' interface we've provided.
We don't really need to know anything about what's going on in the 'Functional Inner Workings' part - we've limited our interaction to the things happening at the interface. On the other hand it's pretty obvious that we need to know something about the type and shape of each of the inputs and outputs.
We don't think about this very often in Excel, because it does a pretty good job of trying to guess what our intentions are... however when we leave it up to Excel to guess, we can get some big surprises when the system doesn't get the expected data type. When data integrity is critical, it'll be important to know exactly what kind of data we're going to get.
Until next time, thanks for reading!
– Brendan
Using custom cell validation to better define the data inputs.
Using custom cell validation to better define the data inputs.
In our encapsulation Example #1 from last week we made a design decision to check the temperature and pressure range
after
they were entered, and store the result of this check as a ‘Pass’ or ‘Fail’ in two cells on the worksheet. That's great if we want to pass on that responsibility, for example, for another worksheet or reviewer to pick up.
We could have also
enforced
this range at the time of input. In Excel we’d do this by setting a
Custom Data Validation
property (not to be confused with computer system validation!):

Here’s the formula for the custom data validation in Example #1:
=AND(Ta<=MAX(Temperatures),Ta>=MIN(Temperatures))
This means that it won’t even let the operator type in anything that doesn't satisfy this equation - i.e. the air temperature cell
Ta
** must be **between the maximum and minimum of whatever cells
Temperatures
points to. As an aside, notice how named ranges make this trivial to write and read.
Combined with an informative
Error Alert
when this happens, it should make a pretty clear indication to the operator that the procedure should only be run when the environment is within range! It also guarantees that the calculations on this page will always get valid numbers, at least from this field.
Let’s update our table from yesterday with these new constraints for the
Air Temp
and
Air Press
inputs:

Stop to consider for a second. Is this what we want? That depends - if the calculations give invalid answers when fed numbers out of the range, then it's definitely what we want.
But what if instead, we wanted* *this worksheet to act as a record of the lab temperatures, even if it's out-of-range? In that case we clearly don’t want to restrict the operator’s ability to enter data if the temperature happened to be 14 degrees in the lab!
Nevertheless we can still use cell validation to guide the operator's input - for example limiting the temperature to
positive numbers
(assuming the heat never goes out during a cold spell!). Where and when you want to restrict input really depends on your requirements - often it might be better to provide good error messages when things go wrong, instead.
Until next time, thanks for reading!
– Brendan
Subscribe to the HaiQu newsletter!
Join me on the HaiQu newsletter as we take a few minutes to explore, design, test and improve the critical systems we use in our regulated facilities. From spreadsheets and software to SOPs and forms and beyond.
We'll never share your email. Unsubscribe any time.